There are many guides showing how to upgrade your PS5 storage. Here’s another one to help folks find the answers they need even faster!
The PlayStation 5 has one (1) internal slot for an additional solid-state drive (SSD) that you can use to upgrade your storage capacity. You’ll need to take off the PS5 case, open the slot cover, insert your SSD, close everything up, and then boot up your PS5 and format the card. You’ll then be able to use the card to store some of your PS5 data.
It’s actually not that difficult, but like all tech things that involve opening up a $500 dollar gadget, it can be intimidating at first.
Here’s what you need to do.
Get an SSD that works with the PS5
Purchase an M.2 SSD, it should have specs similar to below.:
Interface: PCIe Gen4 x4 M.2 NVMe SSD
Capacity: 250 GB to 4 TB
Size: 22 mm width (25 mm wide drives are not supported), up to 11.25 mm height (with a heatsink). Be sure it comes wit heatsink!
If all that sounds, complicated, don’t worry because most manufacturers will specially say whether their product can be used with the PS5 right on the website.
Here’s what I got. Two terrabytes of powerrrrrrr.
Shut it down! Get a screw driver!
Before you do anything, completely shut down your PS5 and unplug all the cables. Remove the stand if you are using that. Move the PS5 and the SSD to a clean well lit spot where you can get to work. You will need a Phillips screwdriver.
Take off the cover
Strangely this may be the hardest part. You do not need any tools to take the cover off. You need to take of the or “bottom” cover to access the SSD slot. Since the PS5 can be set vertically or horizontally this can be confusing. The disc drive should be pointed away from you and on the left side, and the PS logo should be on the underside of the unit. If it is oriented that way, you’re i the right positoin to take off the cover and access the SSD slot.
To get the cover off, you need to push slide and pull up simultaneously. Watch a few videos. When you finally get it off it will come off way easier than you expected. I was having trouble. Took a break, and my elementary school kid literally got the cover off while I was watching a video. It’s all about the direction and angle, not the force.
Open the SSD slot
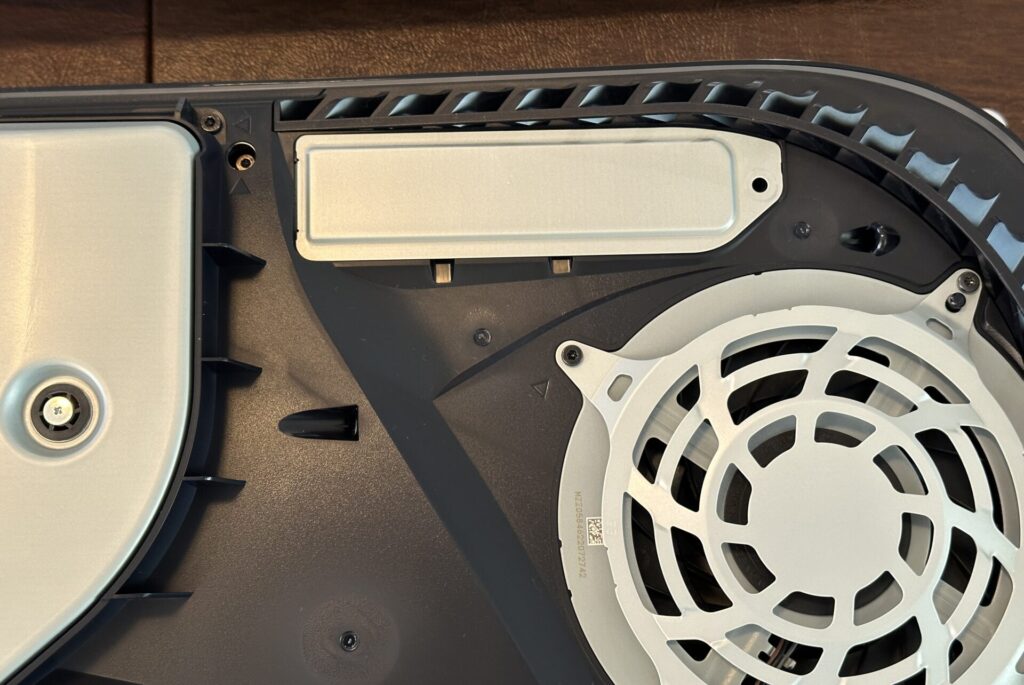
Locate the SSD slot, which is located on the bottom of the console. Remove the SSD slot cover by unscrewing the single screw that holds it in place.
You can see that the screw has been removed in the above photo.
Remove the SSD slot cover
There is one more small screw that will be revealed once you remove the SDD slot cover. You can remove this screw, and use it in a future step to screw down your SSD.
Insert the SSD
Insert the SSD into the slot at an angle and gently push it in until it clicks into place.
Use the screw you removed in the previous step to screw down the SSD.
Now put it back together!
Now just do everything inreverse.
Replace the SSD slot cover and screw it back in.
Reattach the console cover.
Plug in all the cables, and power it up.
When your PS5 boots up boots it should immediately recognize that the SDD is installed and prompt you to format it. Do this.
Confirm that the storage is available
Turn on the console and go to Settings > Storage > Installation Location to see the status of your storage set up, and also to move things around.
Video Time!
Now, fi you want to see a video, and an even better explanation than this, try this video!
Here is the YouTube video that I used to figure this out. Enjoy!
The Gundam statue in Odaiba, Tokyo, was first built in 2009 to commemorate the 30th anniversary of the Gundam anime series. The original statue was 18 meters tall and stood in Odaiba’s Shiokaze Park for a limited time before being taken down.
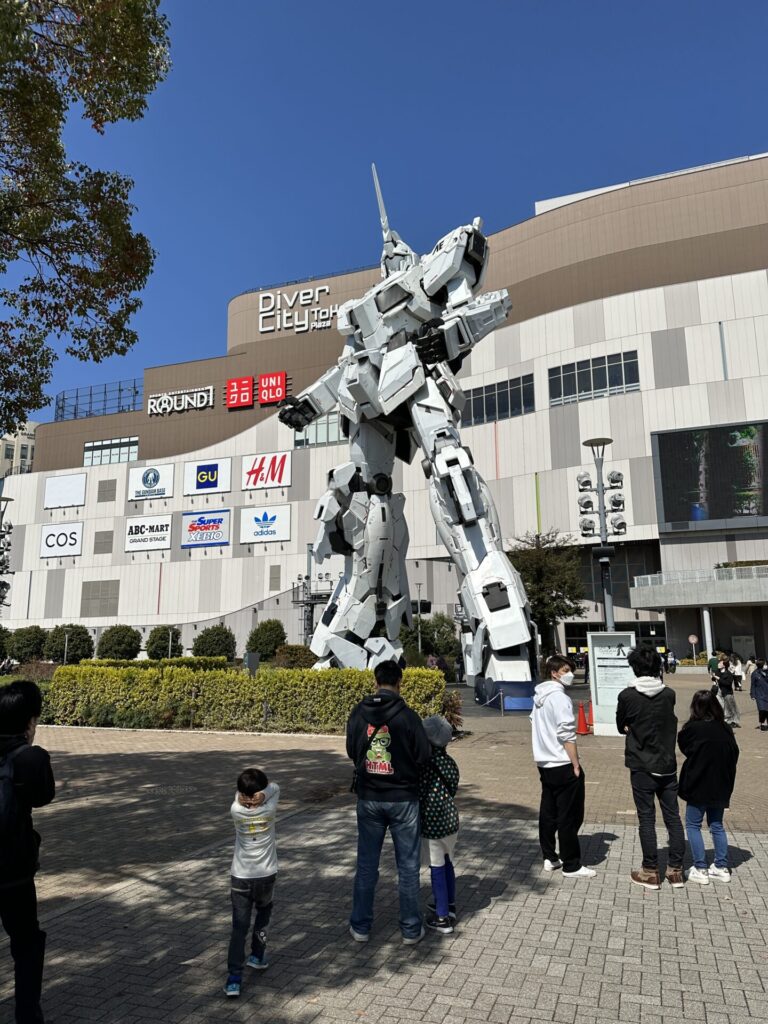
Since then, the statue has been replaced with newer versions several times, with the most recent iteration, the RX-0 Unicorn Gundam, being unveiled in 2017. The Unicorn Gundam statue stands at 19.7 meters tall and features a more advanced design with moving parts and special lighting effects. Check it out in DiverCity Tokyo Plaza.
RX-0 Unicorn Gundam! People for scale.
The lighting effects and moving parts are, well not the most impressive thing ever, but it’s still pretty cool and crowds will wait around for it. If you’re there, you have no reason to skip it, so stick around.
If you like what you see you can visit a hobby shop, or big box electronics store like Bic Camera to shop for a plastic Gundam model to take home as a souvenir. You should be able to find the same RX-0 Gundam that you see here in Odaiba.
What? You’ve never heard of Gundam?
Even though it’s 40 years old, every anime fan should know about Gundam. Gundam is significant as a robot anime for several reasons:
It introduced the concept of realistic mecha: Before Gundam, mecha in anime were typically portrayed as fantastical, larger-than-life robots. Gundam introduced the concept of mecha as realistic military machines, with an emphasis on their engineering and design.
Gundam explored mature themes: Gundam was one of the first mecha anime to explore mature themes such as war, politics, and the human cost of conflict.
Many anime, manga, and video games draw their inspiration from Gundam.
Gundam spawned a successful franchise: Gundam is not just a single anime series, but a franchise that includes multiple anime, manga, video games, and other media.
There are a few other giant robot statues in Japan as well.
Tetsujin 28-go (Gigantor) is in Kobe Wakamatsu Park. The statue is 18 meters tall and was erected in 2009 to commemorate the 80th anniversary of Kobe city.
EVA-01 Test Type in Hakone. It’s located in the Hakone area near Mount Fuji, and is a replica of the EVA-01 Test Type from the anime series Neon Genesis Evangelion. It’s 15.8 meters tall.
There may be more, but that’s all I’m tracking at the moment.
If you’re in Tokyo and want to see a giant robot… Odaiba is the place to go!
We tried the Tokyo Nakameguro Cherry Blossom Promenade (Nakameguro Sakura Tsutsumi) on a Japanese holiday morning that fell in middle of the week. Crowds weren’t that bad, but, we also arrived toke army in the season. Read on for more!
We came about a week too early so the Sakura were not in full bloom. ZANNEN, but that’s fine. You have to miss the timing a few times to fully appreciate the blossoms.
The Nakameguro Cherry Blossom Promenade is famous for its picturesque cherry blossom trees that line the Meguro River. During the cherry blossom season in Japan, which usually takes place in late March to early April (global warming has entered the chat!), the trees along the promenade bloom in beautiful shades of pink and white.
Once you’re done with the Meguro River area you can wander around Nakameguro. It’s known for its trendy cafes, boutiques, and restaurants, making it a popular destination for both locals and tourists year-round.
Meguro River
If you’re in Japan during cherry blossom season be sure to stop by Nakameguro! Might be fun!
Sensouji 浅草寺 is the oldest temple in Tokyo, and it is believed to have been built in the year 628 making it more than 1,300 years old. However, the current structure is not the original. Sensouji has been destroyed and rebuilt several times over the centuries. The temple complex as it stands today was largely rebuilt in the 1950s and 1960s after being damaged during World War II.
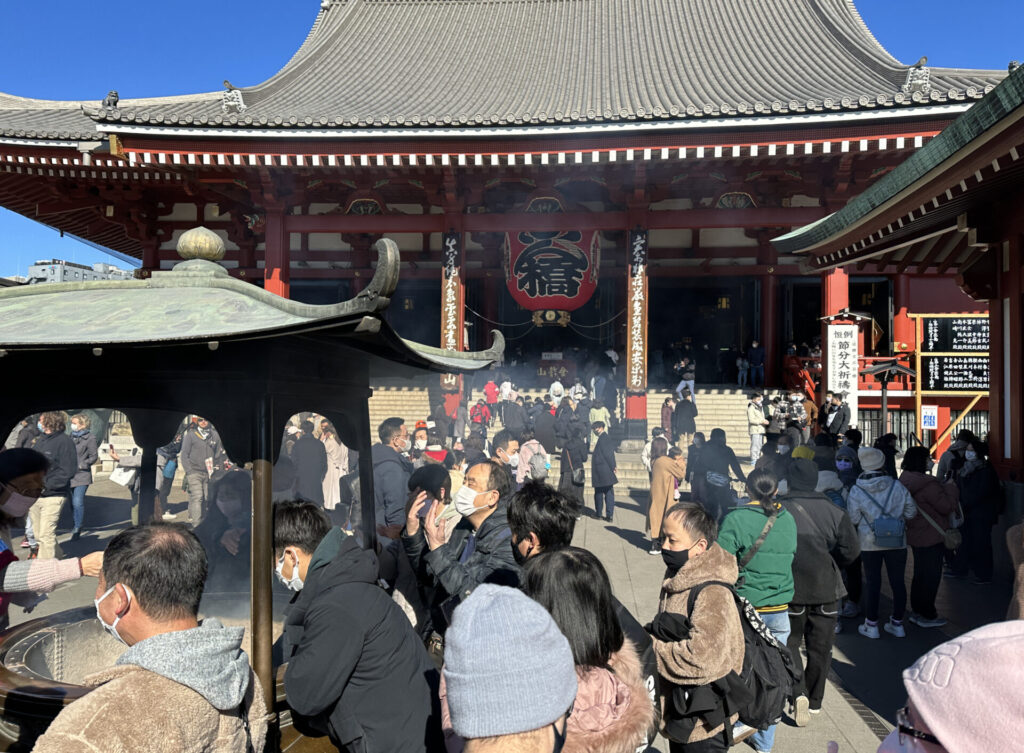
When you visit your senses will be stimulated by the hustle and bustle of tourists and shopkeepers as the crowd slowly moves down the main strip towards the temple. When you get closer you’ll smell burning incense and see the smoke, and you’ll notice many Japanese paying to get their fortunes (mikuji みくじ) from the temple shop. It really is an exciting and unforgettable scene.
Sensouji remains an important spiritual and cultural center and is estimated to receive around 30 million visitors annually. When local Japanese friends from Osaka came to visit in Tokyo, Asakusa was one of the places that we visited. It’s popular with Japanese tourists and foreign tourists alike.
Today, Sensō-ji continues to be an important place of worship for Buddhists and is also a major tourist destination, attracting millions of visitors each year.
Pro Tip
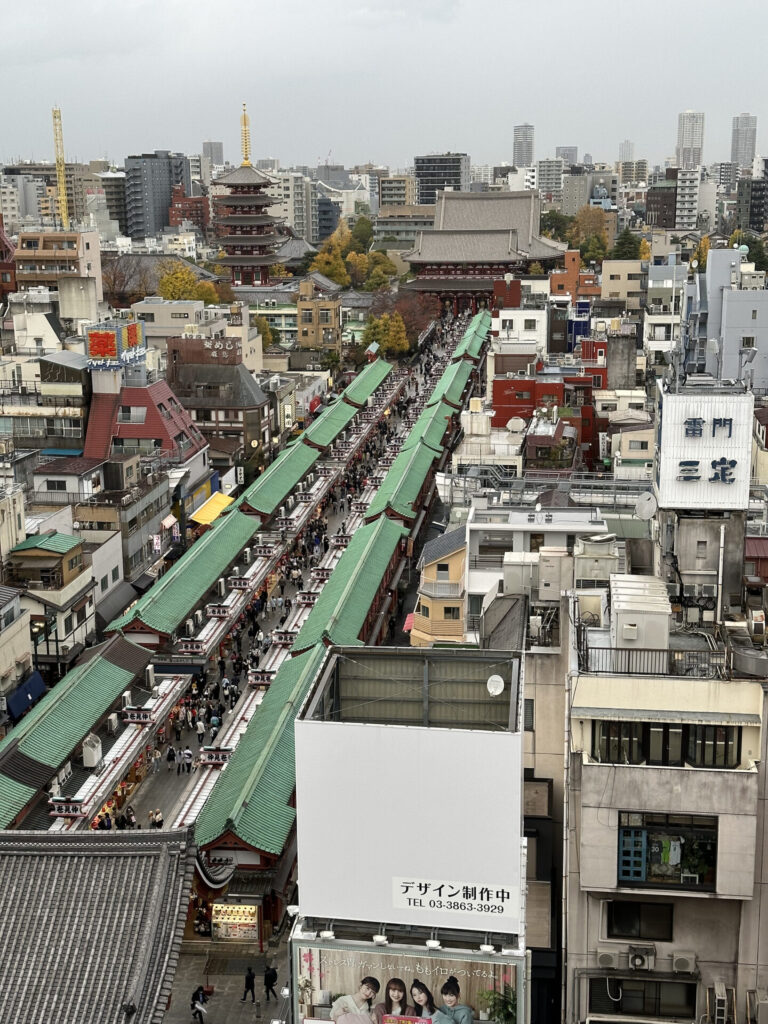
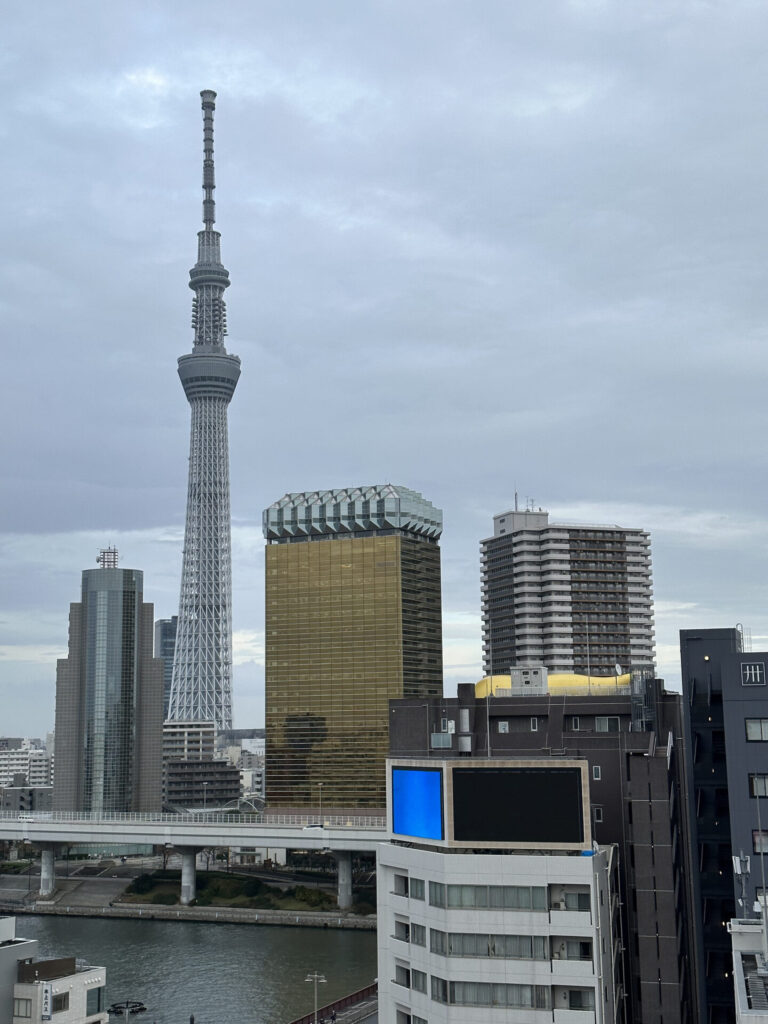
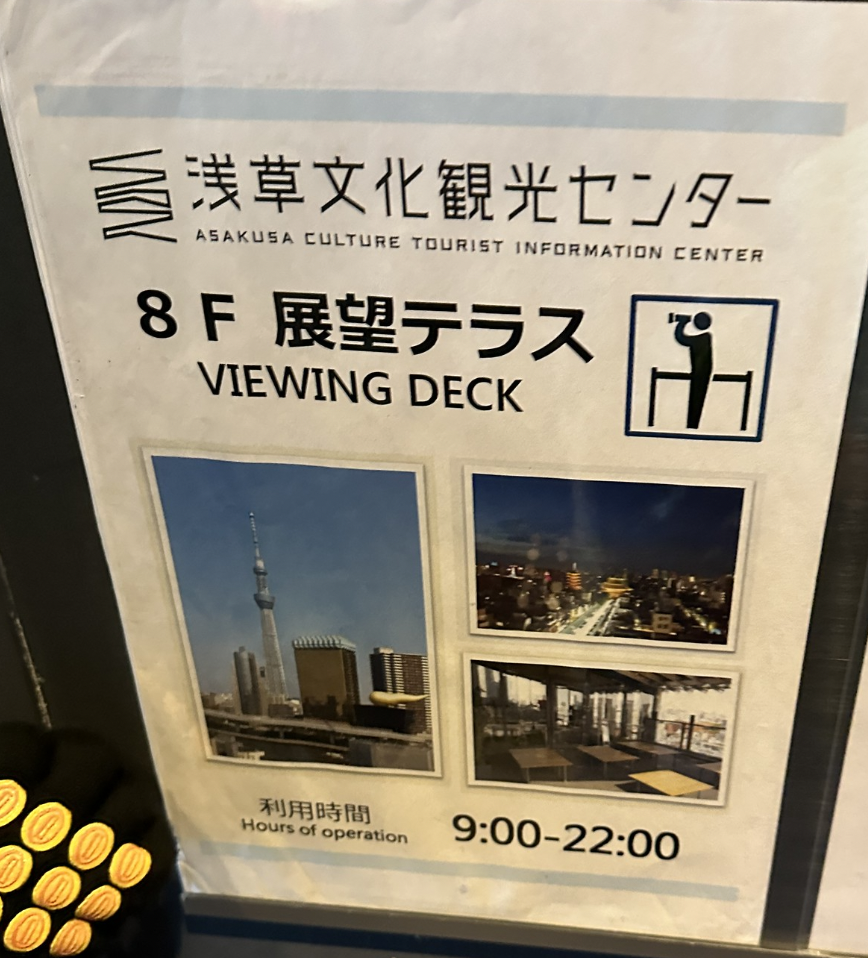
There is a pretty decent free observation deck at Asakusa Culture Tourist Information Center across the street from Sensouji that doesn’t get much traffic. It’s open from 9:00 to 22:00 as of writing. Here is the view from the top.
The viewing deck is on the 8th floor, offering panoramic views of the city. From the deck you can see the city skyline and landmarks such as Tokyo Skytree and the Asahi Beer building. You can also get food there, but to be honest, I wouldn’t recommended it as there are much more delicious options down on street level.
Asakusa Culture Tourist Information Center Viewing Deck 8F 9am to 10pm
Access:
To access Asakusa and Sensouji Temple, you can take the Ginza Subway line and get off at Asakusa station.
The journey takes about 15 minutes from Tokyo Station and costs around 170 yen. From Asakusa Station, Sensouji Temple is a 10-minute walk and is extremely easy to spot due to the flow of the tourist traffic and signage. If you can just get to Asakusa Station you can’t miss it.
Also Nearby:
Don’t forget to also check out Hoppy Street if you get hungry after visiting the temple! It’s a short 10-15 minute walk away, and is lined with Japanese izakaya’s with seating spilling out into the street. It’s a fun environment and somewhat kid friendly. Kid friendly as in, some shops won’t care if you bring kids — that’s about as far as it goes.
Don’t miss a visit to Asakusa Sensouji Temple if you’re in Tokyo! Might be fun!
Another item for your Tokyo visit bucket list, the Ghibli Museum in Mitaka! Might be fun? I’m sure this will be fun. Ghibli! You know. Totoro, Nausica, Howl’s Moving Castle, Ponyo. Need I go on?
There are no photos allowed inside of the building, but it is OK to take photos of the building from the outside. So, those are the photos you will see in this post.
The most obvious and largest attraction at the museum is this giant replica of one of the robots from Castle in the Sky Laputa. It really is huge, impressive, and all-around great. I want one in my backyard. There was an orderly line to get photos with the robot, with guests helping each other hit the shutter so folks could get their photos together. It’s too big for a selfie stick.
Photo includes humans for scale.
The robot is on the roof, and you can just barely see him peeking his head out from the outside of the building.
See if you can find the giant robot in the photo below!
Hello Mr. Robot.
Aside from the main event the museum has little Ghibli easter eggs everywhere. From tiny details in the stained glass windows, to more obvious characters in unlikely places, like in the image below.
Here are some soot creatures hanging out in a random window at the Ghibli Museum.
These little guys are the soot creatures from the 1988 film “My Neighbor Totoro.” In Japanese they are called makkuro kurosuke and are are small, black, furry creatures that live in the attic of the house where Satsuki and Mei, live with their father. They are a central part of the movie’s atmosphere — a really great minor major bunch of critters. I don’t even remember seeing them named in the museum, but here they are! They also appear in another area inside of the building that your kids will love if you’re traveling with them.
There is also a mini theater inside of the museum that runs a short exclusive Ghibli film throughout the day. We saw one about a lump of bread dough that comes to life, obviously, and it really was a treat watching it with all the other fans.
The entire complex is not that large, in a three-story building that covers an area of approximately 3,300 square meters / 35,520 sq. ft., but since the inside is so packed with goodness you can easily spend three hours on site. There are also a couple of places to get food and eat outdoors.
If you you are visiting with small children, there is a park just a short distance from the museum, so you can go there to relax while your kids get dangerous on the park equipment. Perfect!
Exit Through the Gift Shop
The museum’s gift shop, called the MAMMA AIUTO! shop, offers a variety of merch. Some of the items that are typically available for sale at the gift shop include:
Toys and figurines of Ghibli characters
Posters, prints, and other wall art featuring Ghibli characters and artwork
Clothing and accessories featuring Ghibli characters and designs
Books and comics
Stationery
Home goods, such as cups, mugs, and other kitchen items
They even had high-quality figures that cost more than $150 USD when we were there. They even had a replica of the blue pendant that appears in the movie Castle in the Sky that was made by Swarovski. I didn’t buy it.
The selection of merchandise at the gift shop may change depending on timing. They do have a web shop. You can be pretty sure that they’ll have some amazing stuff, so I wouldn’t worry too much about inventory.
Take the JR Yamanote Line from Shibuya Station to Mitaka Station [20 min].
From Mitaka Station, you can walk to the museum. [15 min], or you can take a bus [10 min].
Alternatively, you can take the Keio Inokashira Line from Shibuya Station to Kichijoji Station, which is also located near the museum. From Kichijoji Station, you can walk to the museum [15 min], or you can take a bus.
Get your tickets early
The Ghibli Museum is popular, and not very large. You must purchase tickets in advance. In December 2022, tickets went on sale monthly, and the month completely sold out in one to two days. Tickets can be purchased online or at select locations in Japan, including the Studio Ghibli store in Shibuya.
Visit Tips
It is OK and a good idea to bring kids, even if they are under 4. They’ll have a great time.
Try to leave large backpacks in your hotel as it can get crowded, and there are even some pathways designed so that adults have to hunch over to get through. There is a locker cluster on site.
You can have lunch on site, feel free to plan your visit to span lunch hour.
The gift shop is modern and accepts most credit cards.
There is no “route” laid out, so feel free to backtrack and visit sites more than once. You’ll discover something new each time you run through.
Watch as many Ghibli movies as you can before your visit! It will help you recognize things and have more fun.
Check it out! Let me know if there are any questions you have about the museum that I haven’t answered here!
It’s good to have a project. Keeps the mind sharp. Here’s a project that I thought might be fun, building a custom joystick to use with my Nintendo Switch and PlayStation 4. I have since acquired a PS5, so will need to modify it to be compatible with that too — a project for another day.
Image: My joystick! (Not pictured: The additional three buttons on each side of the controller, or the USB port on the back.)
I will mainly use this for fighting games and arcade shooters, like Street Fighter 6 which is set to come out soon, side scrolling fighting games like Streets of Rage 4, and shmups like Ikaruga, and perhaps ESP Ra.De if I ever get around to buying it.
Interested? Here’s how you can get into your own custom fightstick building project.
These notes are from my personal newbie experience of building my first fightstick ever. I had no idea what I was doing. But I got to the end. Thanks to all the pros in the friendly Fighting Game Community that helped me along the way.
Where to Start Lurking for Information
You’ll want to listen in to people talking about fightsticks for a while to get caught up on the lingo and the common issues and decisions you’ll need to make when building your fightstick. You’ll also want to see images of finished products so you can start to imagine your dream fightstick. You’ll need to learn what a lever is, what PCB options exist, and what a hit box is, to name a few. Here are some recommended places to get yourself up to speed.
When putting together a fightstick you’ll find that there are tons of options. Even at the most basic level you’ll need to make decisions in the following areas…
Joystick or Hit box?
If you’re old like me, you were probably imagining a joystick in the first place. They look like this:
(Image credit: MAYFLASH) Joysticks have a lever and buttons.
The kids these days also talk about hitboxes, which are fightsticks with buttons for up, down, left, right, rather than having a joystick. Hitboxes look like this:
(Image Credit: JunkFood Custom Arcades)
The choice of whether to go with a fightstick or hit box is essential as it will affect which case you need, how many buttons you need to buy, and wiring requirements, among other things.
The Fightstick Case
Do you want a hefty cavernous case that definitely won’t slide or tip off your lap or the table while you are playing? Or do you want something smaller that you could easily pick up and bring to a friend’s house?
Do you want something made of wood? Metal? Acrylic? Some other type of hard plastic? These are all options.
I wanted to do a customized stick, so didn’t want to buy something that already came with a lever, buttons, and everything else.
I wanted to use Sanwa Quiet buttons: OBSFE-30. These are snap in type buttons, which work best on a case that has a top panel of between 2 and 3 millimeters thick.
Note: The ESPADA has a thick front panel, so the snap in buttons didn’t “snap in” but they fit snug and securely. The buttons on the side panels snap in properly.
I wanted something that came with a clear top so that I could put art between the top panel and that clear glass. This one has space for art on every side, and the bottom!
I went to the JxK RivalFools Discord server and asked a few questions, and was showered in help. The designer of the ESPADA himself chimed in to answer my completely newbie questions. Blows my mind. Happy to support them.
This video will give you a quick run through of the many fight stick case options available.
The Lever / Joystick
Passing on the hitbox huh? Me too. Keep it old school. Even though I am a newbie, after my research I feel confident saying that the most famous joystick maker thee days is Sanwa 三和. As you lurk you will hear many people talking about Sanwa sticks. They were widely used in Japanese arcade machines and are trusted for their accuracy and durability.
Aside from Sanwa sticks you’ll also see people talking about Korean levers, and levers with an octagonal that has 8 resting positions for the lever, vs the 4 cardinal directions of most sticks.
You can also go for a silent stick, like I did. I went for the Sanwa Quiet Lever: SANWA JLF-TPRG-8BYT-SK. It makes noticeably less sound as the joystick is moved. Some people prefer the clicky-click of joysticks, but being an old dude with family around when I’m gaming at night, the quieter option was attractive to me.
You’ll notice that the lever is missing the ball that goes on top. Yup, those are sold separately! They’re normally not very expensive until you start looking at the super fancy hardwood finished ball tops.
Lever sound comparison video. So geek.
Fightstick Buttons
Snap type or screw type buttons?
I decided to go with the SANWA OBSFE-30 Silent 30mm Pushbuttons for the top eight buttons on my stick, and I got six Seimitsu PS-14-G snap in buttons for the side panels. The non-silent buttons are cheaper, and I figured I wouldn’t be mashing on the side panel buttons as much, so why not save some money.
Buttons in a baggie! These are SEIMITSU PS-14-G snap in buttons
The PC Board
I honestly did not look beyond the Brook Fighting Board series. Once I started researching, these were recommended so frequently that I just decided to start there. The questions you need to ask yourself when you are picking a board are, which consoles you want to be able to play on, and whether you want wireless. Pros will say that wireless isn’t ideal because of input lag. My gaming is not at the level where that matters… so I’m all in for wireless just for the convenience. I chose the Brook Wireless Fighting Board, which supports PS4 and Nintendo Switch out of the gate. Many people go with the Brook Universal Fighting Board, which supports many consoles, including XBOX, PS4, and Nintendo Switch, and more. I’ll probably build a second stick with the Universal Fighting Board, and get the necessary Brook UFB-UP5 adapter to make it compatible with PS5.
Some of the famous Brook Fighting Boards
Wiring
If you’re like me, this is probably the last thing you’ll realize that you need to figure out. It seems daunting.
I took what seems to be the easy way out, and purchased the Brook Fighting Board Cable (EFM00007728). It was pretty easy to wire up after searching online for some videos and images.
Check out this Wiring Guide by some amazing community member on Reddit.
Artwork
Many fightsticks feature clear panels so that you can display artwork underneath.
You can make your own artwork, or you can commissioning artwork from a professional artist. Print it, cut it, and you’re good to go.
The ESPADA joystick case, which I bought, has one free artwork set at time of writing. You can get it over at FocusAttack.com here for free. If you don’t want to print and cut the art yourself, you can also pay for FocusAttack’s service where they mail you pre-cut artwork.
Some day when I feel like spending extra money for some sweet artwork I’ll probably go get a commission done. You can find artists to commission at @TheArcadeStick on Twitter.
If you’re up for creating your own art, you should be able to find a template layout graphic of your fightstick online.
Those are the basics!
Whelp. That about covers the basics. The case, the lever, the buttons, the wiring, and the artwork. Do some digging and imagine what sort of fightstick you want to build. I am a total newbie at this, and managed to get my first stick working, so If I can do it, you can do it too!
Ginza doesn’t have to be expensive. In addition to some reasonably priced eateries, and shopping staples like Uniqlo, you can also visit this nice area on top of Ginza Six called Ginza Six Garden.
To get to Ginza Six Garden, just go to Ginza Six and head to the rooftop floor. You’ll need to find the elevator bank that goes up to 13F.
Tokyo is a busy bustling place that can really wear you out. This rooftop garden on Ginza Six is a great place to relax and cool down. As you can see from the photos, when I was there on a weekend there was hardly anyone around. Of course, this is just before Japan will fully reopen to tourism on October 11, but I have a hunch that even after the tourists come back this place won’t be packed.
There are benches to sit on, and the view is pretty good. There are so many buildings around it’s definitely not the best view, but hey, it’s free. You can see Tokyo Tower, Tokyo Sky Tree, the Mitsukoshi building, and other sites. I give the view a 7 out of 10.
If you’re in Ginza and are looking for a place to chill out and avoid the crowds, head to the top of Ginza Six and check out this garden. Inside of Ginza Six you’ll find lots of tourist-appropriate shopping, and some very classy restaurants.
Go check out the Rooftop Garden at Ginza Six! Might be fun!
So I have a brass belt loop key holder and it was starting to loose it’s luster. I Googled “how to clean brass” and was surprised to learn that one of the recommended home remedy methods was ketchup!
Let’s give it a shot. Might be fun who knows.
To keep this scientific, here is the before photo. This is a brass key holder that I wear on my belt loop regularly.
Following the steps on the interwebs, I slathered it in ketchup. You’re supposed to let it sit for about one hour to let the natural acid in ketchup do its thing.
I was only able to really cover one side, because ketchup, so I rubbed it around with the paper towel before moving on to the next step.
The next step is to wash off the ketchup! Wipe it down and then wash the entire thing off with soap.
See, more clean. But… did the ketchup do it… or was it the soap???
Apparently you can also clean brass by soaking it in a vinegar and salt solution. I can see a hint of pink on the bottom of the last image there… is it ketchup residue or something else? Who knows.
(Note, this post contains links to the games mentioned. As an Amazon Associate I earn from qualifying purchases.)
I’ve played Outfoxed! a healthy number of times. I have played with kids as young as four, and as old as seven. I suspect maybe it would get a little dry for kids who are 9 or 10 as it’s meant for ages 5+, but let’s see. Anyway, here’s why this game has been so successful and hit the table so frequently when I’m around little ones.
Outfoxed! Cute theme, colorful board, fun components.
What’s It All About?
You can head over to BoardGameGeek and read countless reviews and even get the manual, so I’ll keep this short. In Outfoxed! you’ll team up with other players to roll cute dice to reveal suspects and move around the board to find clues that will help you to figure out which tricky fox is the thief. The game has a fun decoder tool that will let you know how the clue you found relates to the thief. The game is for 5+ and works great at that age in my experience. It plays 1-4 players, and it still plays well at two players.
CooperativeTeam Game
My kids love cooperative board games. I can get them to play head to head in Hive Pocket, Sleeping Queens, and Kingdomino, but if given a choice they’ll pick the cooperative game very time. In fact, when I introduce a new game one of the first things they ask is, “is it a team game?” This is understandable as I don’t purposely lose games to let kids win, so it’s only natural that they would prefer playing something that we can win together without direct conflict.
Entertaining for Adults
Finding a game that is simple enough for a kid to play with a parent, yet not so simple that it bores the parent to death is always a struggle. Outfoxed! does a good job of being interesting enough to keep an adult entertained. It’s also fun for the adult to watch their kids work through the logic puzzle that’s required to identify the remaining viable suspects as more clues are discovered. It goes something like this…
Dad: “The decoder said that our thief doesn’t have a hat, but he does have a scarf. So could this fox with the scarf and the cane be the thief??”
Kid: “No!”
Dad: “Why?”
Kid: “Cause she has a hat!”
As more and more clues and suspects are revealed the deduction gets slightly more complicated. It’s good fun for a kid! It feels sort of like reverse Guess Who?
The kid will need to puzzle through to learn which suspects can be eliminated because they don’t match the information that has been revealed. Eventually, you’ll be able to narrow it down to a single suspect.
Colorful
Outfoxed! has great components. The dice are fun, the colors are bright, and the illustrations are all kid appropriate and obvious. The entire package is very pleasant. Even the box and insert are great!
The components really pop!
Not too Long, Not too Short
Outfoxed! only takes 30-45 minutes to play through. A great length for kids and adults!
Adjustable Difficulty
When a dice roll fails, the fox moves closer to the edge of the board where he will make his escape and cause the players to lose the game. You can adjust how many spaces the fox will move on each failed dice roll to adjust the difficulty. We normally play by moving the fox 4 spaces when we miss the dice rolls. We found that moving 3 spaces was way too easy, and moving 5 spaces is pretty dicey (dad joke) but still doable.
Strongly Recommended
If you’re looking for a game to play cooperative with young kids, you can’t go wrong with Outfoxed!
Highly recommended. I like this so much I have purchased it multiple times to gift to others.
I like games and I travel a lot. While I often have either my Nintendo Switch or 3DS with me, I also enjoy playing games offline whenever I can. You know, analog! It’s more personal. It gets the family together. You can talk to other humans. Have some fun! But great games like Ticket to Ride or Deception: Murder in Hong Kong will never find their way into my travel bag — they are just too large and the boxes might get crushed. So what games do travel well? Here’s my list of games that I recommend for travel. There are many lists like this… but this one is mine.
Note, this post contains links to the games mentioned. As an Amazon Associate I earn from qualifying purchases.
Hive Pocket is frequently mentioned in discussions about games that travel well. Here’s why. It’s so small it can actually fit in a large pocket — a cargo pant pocket if you will. The pieces are bakelite making them near indestructible and easily cleaned. There is no board — the game just uses its pieces. Finally, the game is great and is one of my personal all-time favorites. If you like games that are like chess, i.e., one vs one, no luck, and have pieces that have unique movements, then you’ll probably like Hive.
Yeah but what is the game about?
Expected you to google that! But thanks for sticking with me. The short and skinny of Hive is that each player has the same set of insect tiles. On your turn you will either place a new one, or move one that is already in play. Each type of bug moves differently. Unlike chess, pieces never leave the field once placed. To win the game you must completely surround your opponent’s Queen Bee piece. Hive is a very thinky game that can play as quickly or as slowly as you please. On average, I would say games take about 15-25 minutes.
But Hive can’t beperfect… give me the straight story.
OK fine. Here’s what to watch out for. As Hive is a no-luck game, if you’re playing against the same opponent over and over again eventually one of you will likely emerge as the better player. Being a no-luck game like chess, it will be nearly impossible for the weaker player to win. Some people might not like that, but here are a couple of Hive house rules you can use to adjust the game to fit players of different skill levels.
House Rule Hive to Support Different Skill Levels
Blind draw: Have the stronger player turn all of their pieces upside down except for the Queen Bee. When they choose to place a piece on their turn, instead of picking which piece they want to place, they must instead randomly select one of the face down pieces, look at it, and then place it.
Fewer Ants: Ants are clearly a strong piece in Hive. By default each player has three. To balance the game, give the stronger player fewer ants.
Blind draw and fewer Ants: Combine the previous two house rules! I have used this method to play Hive with my elementary school aged kid to even things out.
Sprawlopolis
We actually managed to win this one… Haven’t won much since.
Sprawlopolis can be purchased at ButtonShyGames.com and is in their line of 16-card micro games. This is a cooperative city building game that can be played solo or with another player. Basically, you’ll look at your card options and choose a card to add to the city. Cards can overlap as you place them, leading to countless (at least feels like it anyway) possibilities. If you want to actually figure out the optimal place to play each turn, your brain will melt out of your ears. Analysis paralysis to the max. Your goal is to score points in a variety of goal categories that change each time you play. It’s an amazing design accomplishment for such a small package!
Take 5 (AKA 6 Nimmt)
Take 5, which is also known as 6 Nimmt in the original German, is a game placed with a unique deck of cards. I have never had this game fail when introducing it to a group. People understand it quickly, it brings lots of laughs, and everyone will quickly think they have figured out the ultimate strategy only to get blown out of the water when something unexpected happens. Take 5 plays 2-10 players according to the box, and I have found it to be great fun from 2, all the way up to 6-7 players. For this reason it’s a great travel game, as you can pretty easily include any unexpected friends you might make along the way.
Another perfect game huh? Seriously…
Okay, negatives about Take 5 would be that while the game is “just a stack of cards,” it is 104 cards so it’s a fat deck. For reference, a standard deck of playing cards consists of 52 cards. Also, once the number of players exceeds seven or so, Take 5 becomes hard to predict and chaotic — very much not a game of pure skill. It’s still hilarious fun though!
You’ll also find some viable travel game options in print and play games. I have blogged about several, including Ada Lovelace Consulting Detective, and Raging Bulls which would be a great place to start. All you’ll need is a pre-printed piece of paper and a few dice to play these.
This list of travel-ready board games should be a good start for anyone. You’ve got a head-to-head game with endless strategic possibilities (Hive Pocket), a difficult cooperative game (Sprawlopolis), and a zany party game that can play up to 10 but still works reasonably well at two players (Take 5). Maybe I’ll do a part two to introduce more travel-friendly games!